Saturday, November 26, 2011

JEKYLL ISLAND CHRISTMAS

I am lucky to live close to the beautiful and historic state park, Jekyll Island. My family and I took the short trip over to the historic district tonight for their annual Christmas tree lighting festival.  It was such a wonderful evening punctuated with a beautiful and exciting fireworks display.

There are only 28 days left until Christmas Day. What will you and your family be doing to celebrate the season?


Tuesday, November 22, 2011

Everyone Needs an Angel: Part II

Now that you have your angels made, you have to decide what you would like to do with them.  You can leave them as they are.  You can let your kids paint them, or add glitter.  There is no limit to what you can do to “finish” these cute little ornaments.  This tutorial may seem like overkill for a simple clothespin craft, but.  I wanted to take something simple and it into an heirloom quality item.  I think I accomplished that.  I decided to “antique” my angels.

I used inexpensive tubes of Apple Barrel paint and Deco Art crackle medium.  I first painted the angels a cream color.  I allowed them to dry.  Then I went over the paint with the crackle medium. 


There are no bonus points for neatness here.  You want the finish to be a little rough.  If the paint is thicker in one spot than another – perfect!  The perfection is in the imperfection! Use the same thought process with your crackle.  As a matter of fact, you don’t have to crackle the entire angel.  If you like, you can just do a spot or two.  Use your own artistic interpretation of “antique.”


Close-up of crackle finish


Now we want to really give it that dirty, dusty, old look.  For this we need stain.  You can purchase a water based stain if you like.  I chose to make my own stain.  To do this I used an olive colored paint and mixed it with water. 


The more water you use, the thinner your paint.  This is completely up to you.  You can experiment on a scrap piece of wood if you like to determine the best consistency for your taste.  My stain is pretty runny.   The crackle finish on my angels is pretty fine and I want the stain to get down into the small crevasses. You can drop your angel in the stain or use a sponge or brush. 


You can rub off excess stain (as I have done) or you can allow the stain to dry as is. I recommend using coffee filters to remove excess stain.  They are lint free and absorbent.  I have found they work best for me.  You will need to let the stain completely dry before moving to the next step.


We are in the final stretch now!

Once your angel is completely dry, we need to put a protective coating on her to keep her looking great.  My choice of medium for this task is paste finishing wax.


Using a small amount of wax and a coffee filter, lightly buff the angel with the wax.  This will give her a protective satin finish.  It adds just the right finishing touch to the antique character of the angel.  A bonus too in that there is no drying time once you are done, you are done! A word of caution though;  buffing too hard can damage your angel.  An angel without wings and a halo, just isn't an angel.  Go lightly and you will be pleased with your outcome.

If you would like your angel to star in your latest Christmas tree production, then you will want to add a string.  I have chosen to use silk cord, like that used for jewelry (mainly because I make jewelry and have it handy), but you may use whatever stringing material you like.


Put a dot of tack or craft glue (something that will dry clear) at the center top of the angel's wings.  There should be enough space to gently tuck the ends of the string so that they are hidden below the wings.  You may need to use a toothpick to aid in hiding the ends of string.  Let this dry overnight to insure a firm hold on the string.

All this work has paid off!  We now have a beautiful angel(s) to adorn our household Christmas scenes!


Monday, November 21, 2011

Everyone Needs an Angel: Part 1

Have you looked at your calendar lately?  I don’t know why, but I keep getting shocked by just how close we are to Christmas!  Only 4 more Sunday’s lie between today and the big day!  Thursday is Thanksgiving!  Black Friday is – THIS FRIDAY!!!  I have already seen outdoor Christmas decoration going up and the stores have been playing Christmas Carols since November 1st!  I feel like I just put away all my decorations for this past year, and still, hear we are again!

The good thing is, I LOVE CHRISTMAS!!!  I love everything about it.  I love the carols, the lights, the blow up Santas and Snowmen!  And here where I live we have temperatures up to 80 degrees this week!  We need all the decorating we can do to really bring that Christmas spirit. I mean, the weather surely isn’t going to be helping us.  Christmas shopping in shorts might be appealing to some, but I find it depressing!    So what can we do to lift my spirits?  Well, sometimes it takes an Angel, or 20…

I have made some really cute and super easy Christmas tree ornaments.  You can make these as simple or elaborate as you like.  I am going to post in two parts.  Today we will assemble our angel.  (Check back tomorrow for finishing touches.)

For materials you will need the old fashioned style clothespins, clothespin doll stands, and some miscellaneous “Woodsies” purchased at my local craft store. I bought a large bag of assorted Woodsie pieces.  Oh, and some wood glue!  That is it.


I first glued my clothespin into the clothespin doll stand.


Next I picked out a small circle from my assortment pack to use as a halo.  I glued it on a little slanted.  Don’t worry.  It is light enough to stay nicely in place.


Then I picked out two teardrop shaped pieces to use as wings.  I glued these to the center of the back of the clothespin under the halo.  Be careful not to use too much glue or it will run and the wings will slide out of place.  The right amount of glue will keep the wings positioned the way you like.


Now you have a finished angel!  This is a great project to do with your children, but I chose to go just a bit further with my angels.  I will share that with you tomorrow in Part II!


Thursday, November 17, 2011

Bailing Out

Let's Make a Basic Wire Bail


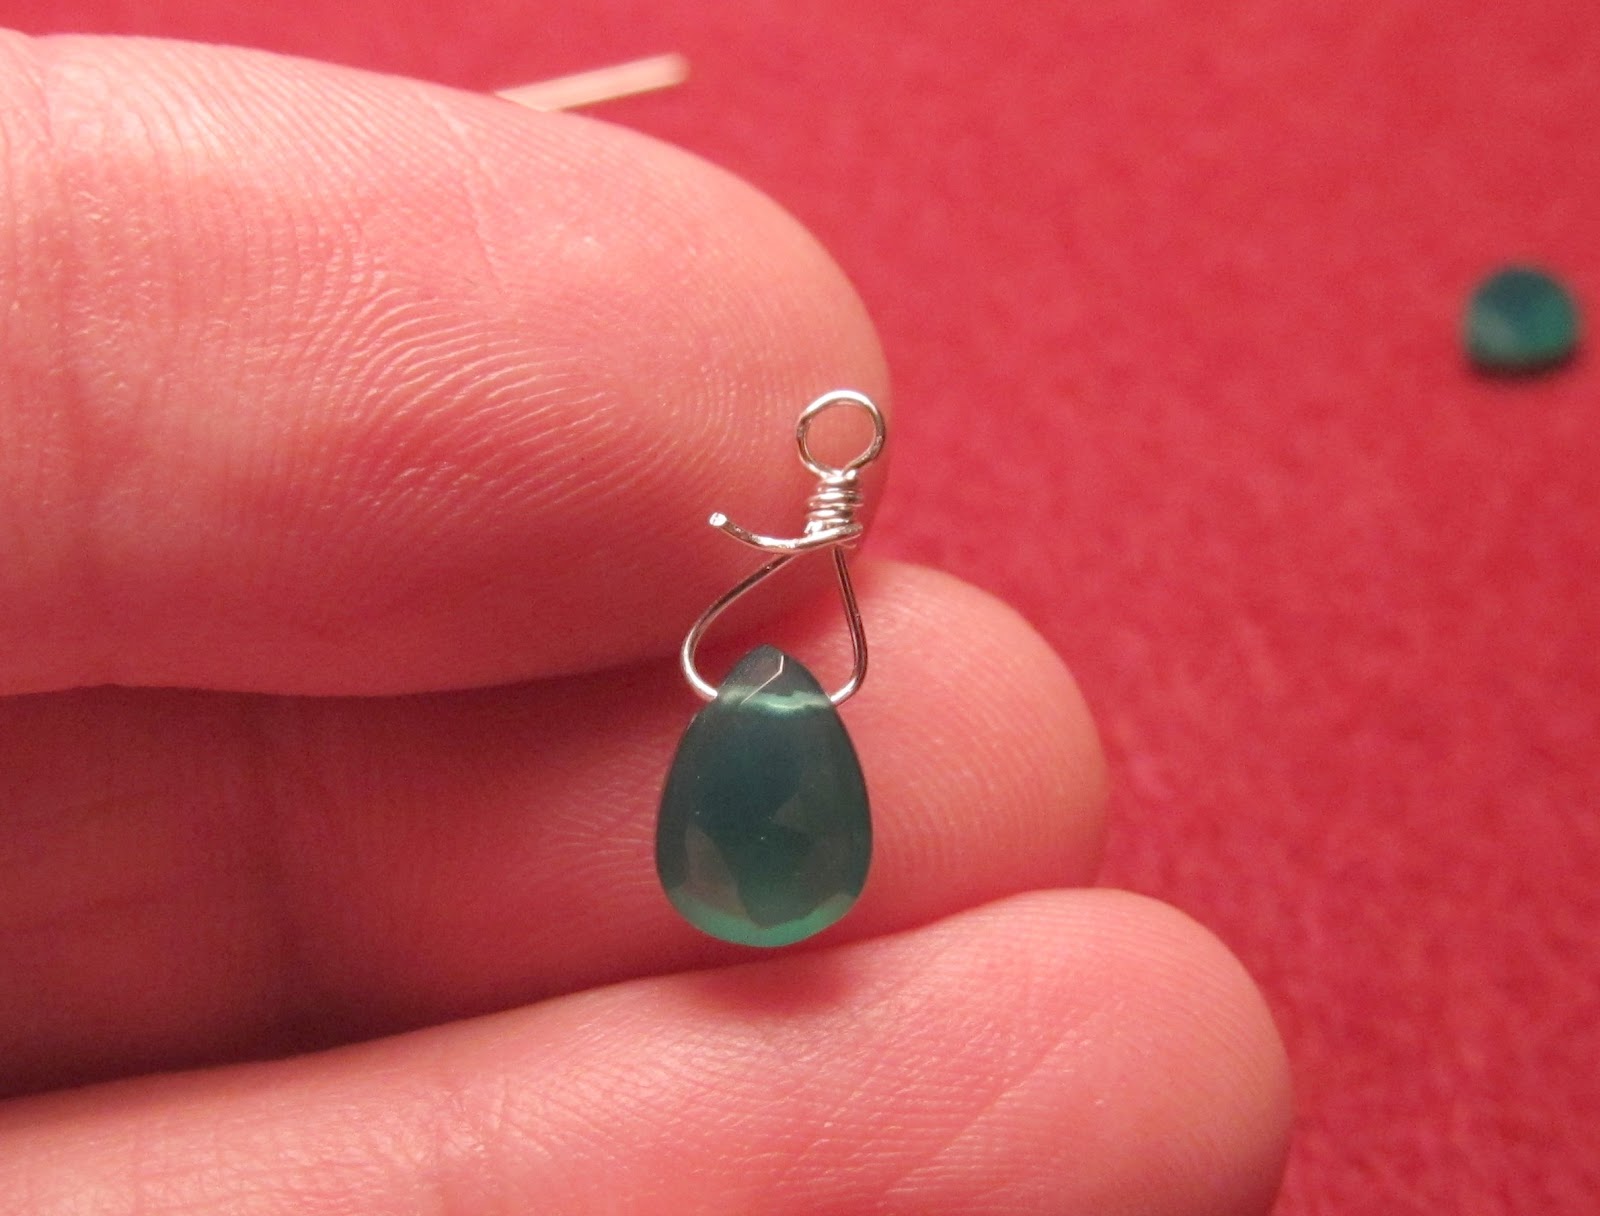
Gather all your materials.  You will need wire (I have used sterling silver), a bead or beads ( I am using emerald briolettes), wire cutters, a pair of round nosed pliers, and at least one other pair of pliers of your choice.

Cut a length of wire appropriate for your bead.  (Note: The size of the hole in your bead will determine the gauge of the wire you need.  The higher the gauge number, the thinner the wire.) 

Thread the wire through your bead.
Fold both ends of the wire up creating a triangular shape. Don't fold the ends too tightly. (Note: If you are using a small briolette, as seen here, use caution. They are fragile and will break if the wire is too tight. You want it to "swing" slightly on the wire.)

I apologize for this blurry picture...  Now you should pinch one end of wire between the round nosed pliers.  Bend it at a 90 degree angle away from the crossover point.

Keeping the wire pinched between the nose of the pliers wrap the wire back toward the crossover point over the pliers creating a rounded loop.

Now we are ready to start wrapping.  Pull the leftover end of the loop down and around in front of the other length of wire.

With your other pair of pliers, pull this end of wire tightly all the way around the other wire, as if wrapping a rope around a tree.

Wrap until you are out of that length of wire.  If you have any gnarly ends you can clip it off with your wire cutters.

Wrap the other length of wire in the same fashion around and on top of your first wrap.


Cut any excess wire.  Make sure to tuck or file the end so that there are no sharp edges.

Viola!  Your beautiful bead now has a bail and can be added to your fabulous jewelry!

Wednesday, November 16, 2011

Green with Envy


After my inspirational journey through my latest Sundance catalog,  I decided that I needed a new leather cord necklace!  Does that have anything to do with all the beautiful leather pieces in the catalog? I plead...Guilty!  I was just so envious of all the beautiful pieces! So here is my quick and easy version of the Sundance inspired necklace.


I used sterling silver for all my metal components as well as semi-precious gemstones, but you can make an equally beautiful piece with less expensive materials. You are limited only by your imagination. I will take better pictures than this too.  Cross my heart!  I was so excited last night I just couldn't wait to snap a couple of quickies.


I learned how to wrap wire for "dangles" by reading beading magazines.  I plan on doing a few tutorials for this for anyone who may not be familiar with how to do it yet.  I will try for tonight.  I say "try," because I work full time and have two rambunctious little boys that sometimes like me to pay less attention to my arts and crafts and more attention to them.  Imagine!  I love, love, love, my boys! I will get the pics up though, cross my heart - again, and just for good measure, pinkie swear too! Stay with me...


Tuesday, November 15, 2011

SUNDANCING...

God love Robert Redford for this gift to the world! That is how I feel about it anyway. I love to find a Sundance catalog in my mailbox! This catalog is such a great source of inspiration to me.  After browsing the pages of beautiful artisan goods I am so motivated! Create? Lets!

Monday, November 14, 2011

Christmas Cone-Head!

Yes Sir! That's me - a Christmas cone-head! I am sure you have see a lot of cone shaped "Christmas Trees" being sold for decorations in pretty much every retailer that sells any kind of Christmas decor.  Some are metal with lovely dangles, some a plastic with sparkles and glitter... So pretty.  Well, I am stealing this and making my own.  I am not selling you my version of this idea as anything original, but you can certainly create your own original take on this very idea! 

For my version, you will need a paper mache cone (find one at your local arts and crafts store), a hot glue gun (make sure it is fully loaded!), and plenty of pretty floral "picks" (also found at your local arts and crafts retailer).
As you see, I chose picks with these beautiful berry-like doo-dads.  They come in all shapes, sizes, and colors.  You can use whatever you like.  I also covered my cone with a like colored piece of felt prior to adding my berries, but depending on your color palette, you can do anything you like from using a like colored piece of material, to leaving it as is, to painting it the color you desire.  I used a cone that is approximately 10" tall.  It took about 10 picks to cover my cone, but keep in mind that depending upon what size cone, and the type and size of pick you use, this may vary.

You can simply pull the "berries" from the pick, but to reduce damage to the "berries" I chose to clip them from the pick with a pair of wire cutters.  If you don't have a set of wire cutters, you can get a very inexpensive set from most retailers.  You can find them in several departments from floral to hardware.  I then, very simply, hot glued my "berries" to my cone starting at the bottom and working my around the cone and up to the top.  

Look how pretty she is!

Can't you see her in all her loveliness, standing in the middle of the dinner table during the Christmas feast, surrounded by all the wonderful Christmas finery!  I must make more! So easy, so pretty and I caught the picks I used at a great sale!  So CHEAP!!!  But so pretty, no one will know!